Sale Ends Today! 75% off our annual membership. Get skills that fulfill.

 Ryan
Ryan
If you are drawing a human, say a portrait, the face is the first thing people will look at. Therefore, it is essential to understand the different proportions of a face in order to create a realistic and accurate drawing.
There are seven important facial proportions to know, and we will discuss them in detail in this blog post.
Although beginners need to study and understand facial proportions, they should remember that these are only guidelines. Everyone’s face is shaped differently – something to remember when beginning your journey into learning how to draw faces.
However, following the facial proportion guidelines will make your drawing look closer to reality.

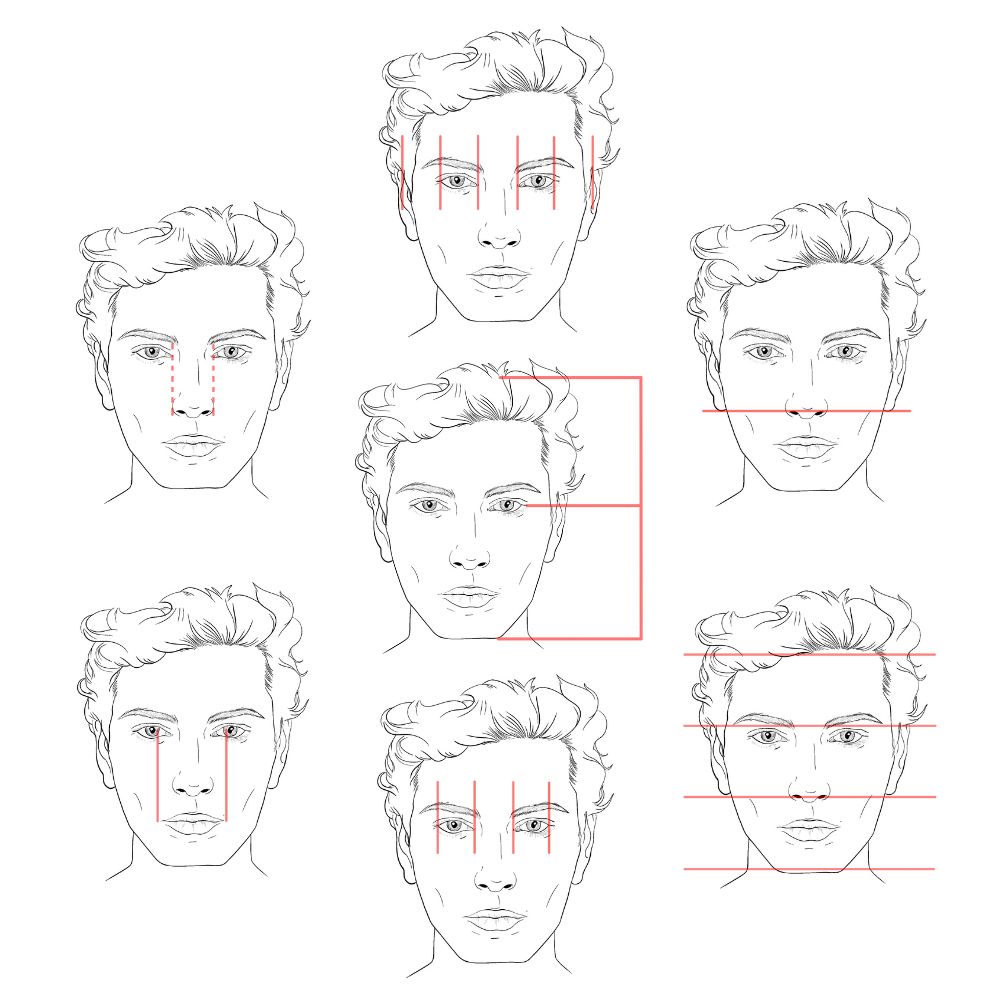
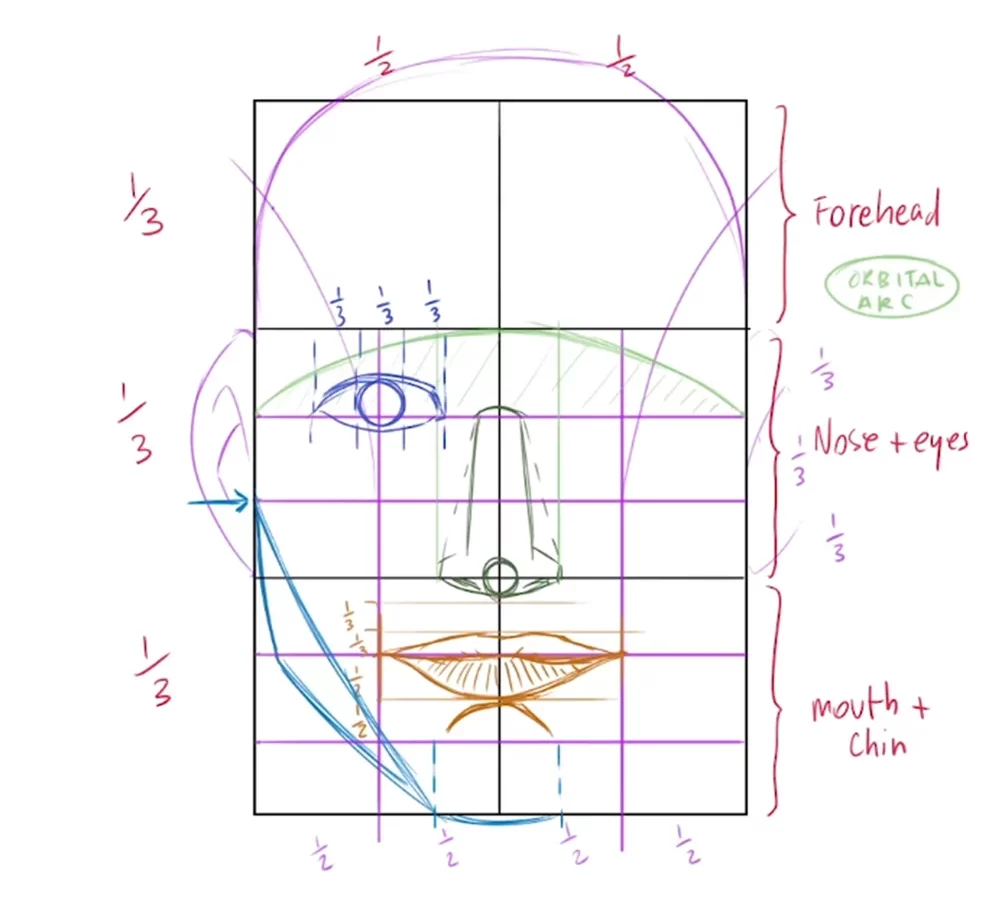
Let’s start with the basics. The face is divided horizontally into three equal parts.
Many artists and animators use this classic face proportion rule when drawing faces. Understanding these basic facial proportions allows you to draw the face with accuracy and balance.
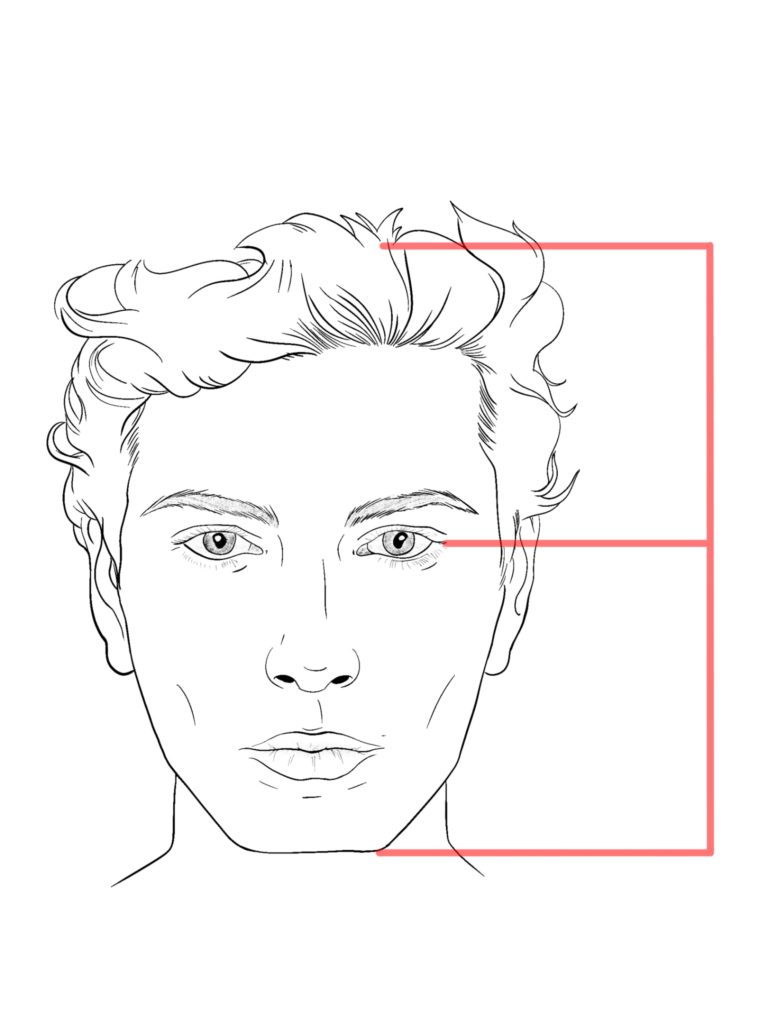
The eyes are located midway between the top of the head and the bottom of the chin. This means you can draw a line from the top of the head to the bottom of the chin and divide it into two equal parts.
The eyes will be positioned along the line separating the top half from the bottom half of the face. This helps to keep facial features in perspective.
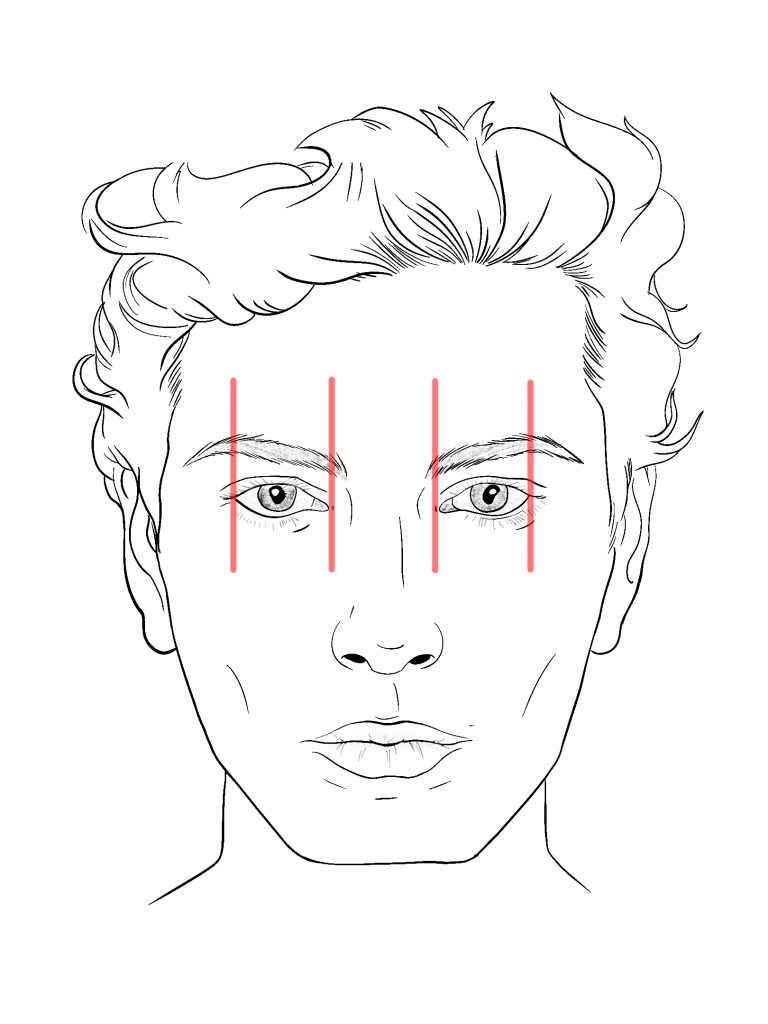
The space between the eyes is approximately the same width as one eye. It’s essential to be aware of this when drawing faces, as it helps to keep features in proportion.
While features can vary in size from person to person, keeping this ratio helps make your drawing look professional and accurate.
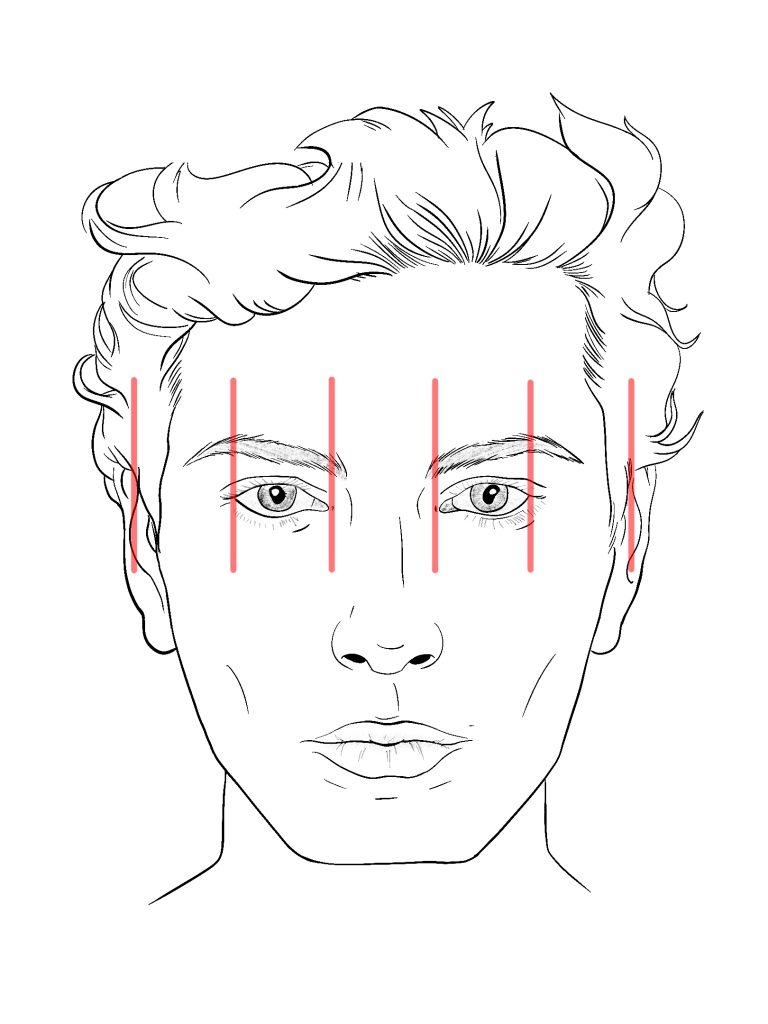
In addition to considering the space between the eyes, you should also note how wide the head is compared to an eye.
The average width of a human head, from ear to ear, is approximately the same length as five “eyes.” This is a simple way to measure the general shape of the head when drawing faces.
Therefore, if you want to draw eyes with accurate proportions, then you need to make them slightly larger than 1/5 of the total head width.
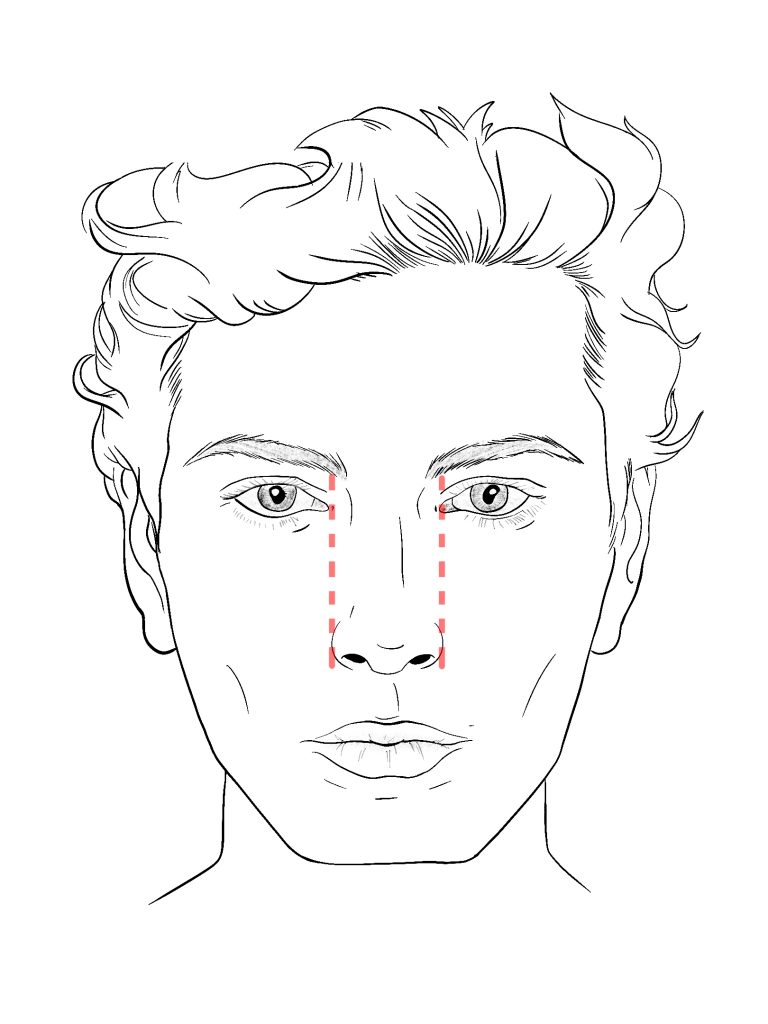
The next thing to consider when drawing a face is the placement of the nostrils. The edges of the nostrils should line up with the tear ducts of the eyes. This helps to keep features in perspective and creates a realistic look.

To draw realistic-looking lips, you must remember that the corners of the mouth should line up with the pupils of the eyes. This is another proportion rule used by many artists and animators when drawing faces.
This creates an attractive balance in your drawing and helps to keep proportions consistent. This will ensure you create a structurally accurate and aesthetically pleasing face.
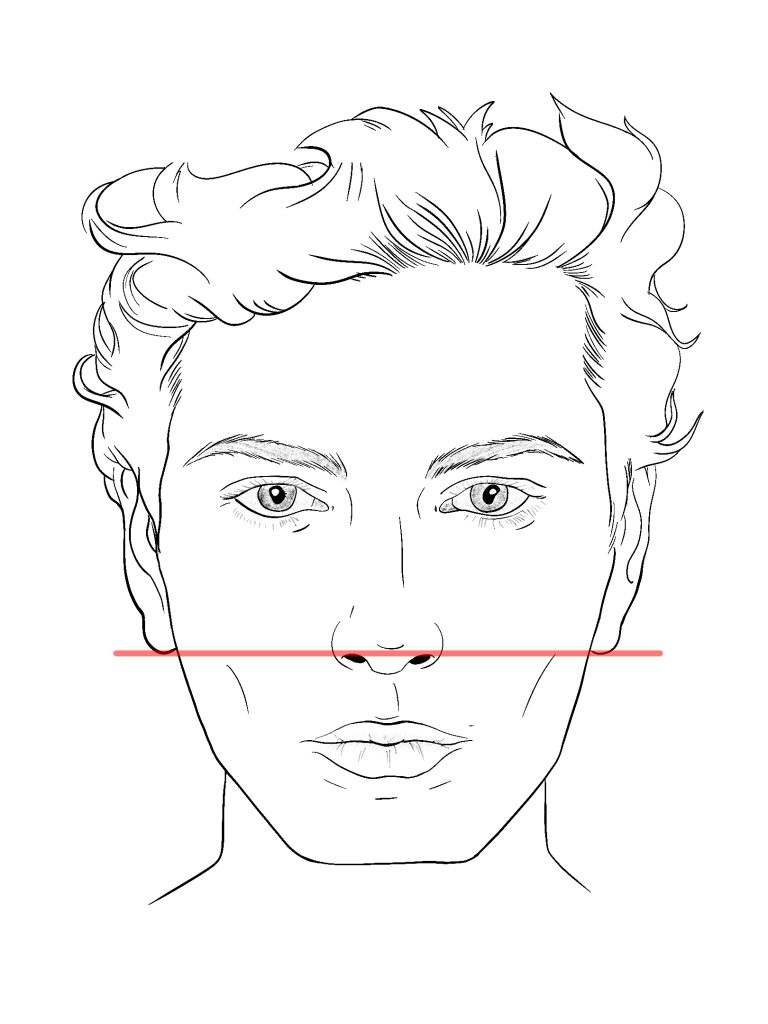
The bottom of the ears should always line up with the bottom of the nose to create an accurate face. This basic face proportion rule will ensure that your drawing looks natural and balanced.
This rule is also important for animators as it helps create a believable and natural face.
The Loomis Method is an essential face proportion drawing technique artists, and animators use. This method was created by the renowned American artist Andrew Loomis, who wrote several books on drawing and painting.
This method relies heavily on facial proportions to create balanced and realistic-looking faces. It starts with a circular ball divided into four equal sections. From there, two lines are drawn at right angles to each other to create a face shape and establish the face proportions.
The Loomis Method further divides the face into several distinct divisions. These divisions guide placing facial features like eyes, nose, mouth, and ears. By using this method, artists can create faces that are more proportionally accurate and better capture the realism of an actual face.
The benefits of using the Loomis Method include the following:
Another advantage of the Loomis Method is that it can be used in both traditional drawing and digital art. This makes it a great technique for both professional and amateur artists.
Overall, the Loomis Method is an efficient way to draw face proportions accurately and quickly. This makes it an excellent tool for any artist who wants to create realistic-looking faces with precise proportions.
When drawing faces, it is essential to consider the differences between male and female face proportions. The face proportions of men and women differ significantly due to hormonal makeup, body shape, and face structure.
Male faces are generally wider than female faces, with more prominent chins, noses, and eyebrows. However, female faces are usually smaller, have larger cheeks, and have smaller and less prominent brows, noses, and chins than male faces.
In addition to face size and shape discrepancies between genders, men typically have a stronger, angular jawline and face structure. In contrast, women have a softer, rounder, and more delicate facial structure. This is why face proportions for male and female faces can be different.
The differences between the face proportions of men and women also influence how they need to be drawn to look realistic.
When drawing a face, it is essential to consider the differences between male and female face proportions. This will help you create a realistic-looking face that captures the unique characteristics of each gender.
The nose is often considered the easiest facial feature to draw. This is because noses are generally round and resemble a sphere, making them simpler to draw than the other facial features.
Generally, men’s face is easier to draw than women’s face. This is because the bone structures and muscle groupings in men are more pronounced, making their faces easier to trace than women’s.
Additionally, more men have square-shaped face structures, which makes it easier to shape the face with a few simple lines.
Women’s faces tend to be more oval or curved in shape, which can be more challenging to replicate in a drawing.
Now that you know the five main proportions of the face, you can use them as a guide to help you draw a perfect face.
By understanding these proportions, you can create faces that are realistic and accurate.
Remember, no “perfect” face exists, so don’t be afraid to experiment and have fun.
For beginners, our courses “Fundamentals of Drawing” and “Learn to Draw in 21 Days” provide a solid foundation.
For beginners eager to explore this classic art form, our course, “Figure Drawing for Beginners,” can be a good place to get started with this classic art form.
As you gain confidence and seek to elevate your skills, our “Fundamental of Character Design” and “Character Design” courses can provide deeper insights.
You can also check out the collection of our online courses. To decide which course to buy, check out our blogs on 11 Best Online Digital Illustration Courses and 8 Best Procreate Courses, where the courses are explained in detail.
Ryan


 Gift Cards