Sale Ends Today! Get annual membership for only $59! You save: $176 ($235).

 Rhea
Rhea
Have you ever wanted to create your own totally unique custom brushes in Procreate? Maybe you need a specific texture or tool for your illustration, or maybe you simply want to experiment with something new.
No matter what your reason, there are a bunch of awesome ways that you can create a brush in Procreate. Creating your own brushes is also a great way to discover more about the Procreate app and learn about individual brush settings!
So, without further ado, here are some of the different ways you can learn how to make a custom brush in Procreate!
Still a beginner to Procreate? Take a look at one of our Awesome Procreate Courses to help get you started!
(For this tutorial, you will need your iPad, Apple Pencil, and the Procreate app.)
To begin creating your own custom brushes, first, enter the Brush menu (Brush Library) by tapping on the Brush tool and select the plus sign in the top-right corner of the menu. This will create a default brush.
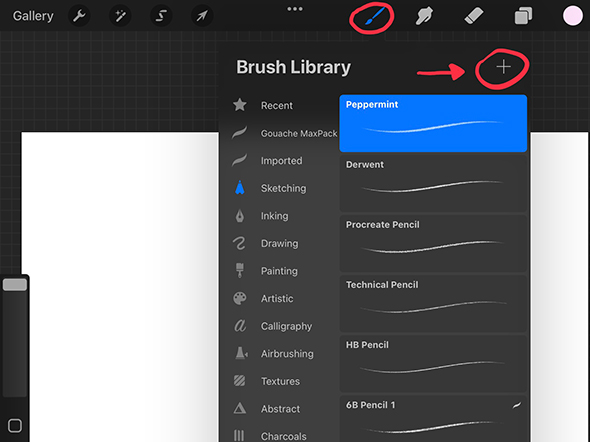
You should now see that a brush called ‘Untitled Brush’ has been created. You can now start to customize it within the Brush settings menu (also known as the Brush Studio). A good place to start is with its Shape settings.
Learn about Procreate’s different brush settings and what they do. This will allow you to create your perfect Procreate brush. To help you with this, we have compiled a list of all the brush settings below, showing how they help you customize your brushes!
When you are first experimenting with your brush settings, it can help to create a duplicate of one of the existing Procreate brushes to test them on.
To do this, simply swipe left on your chosen default brush and select Duplicate. Once you have duplicated one of the default brushes, you will be ready to move on to the experiments shown below!
(Note: This method can also be used to create custom brushes out of an existing brush.)
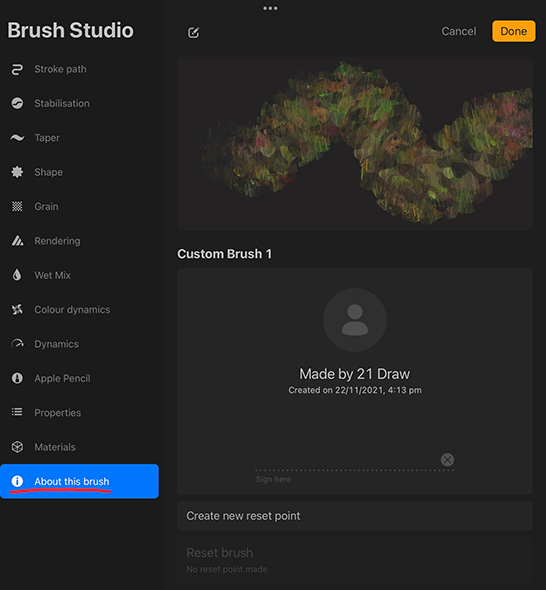
PRO TIP: Remember you can reset your brush at any time during your testing by going to the About this Brush menu in the brush settings and selecting Reset all Settings.
So, let’s get started! To open up your test brush settings, simply tap on your desired brush.
(In the brush settings menu, you can test your settings using the Drawing Pad in the top right-hand corner of your screen.)
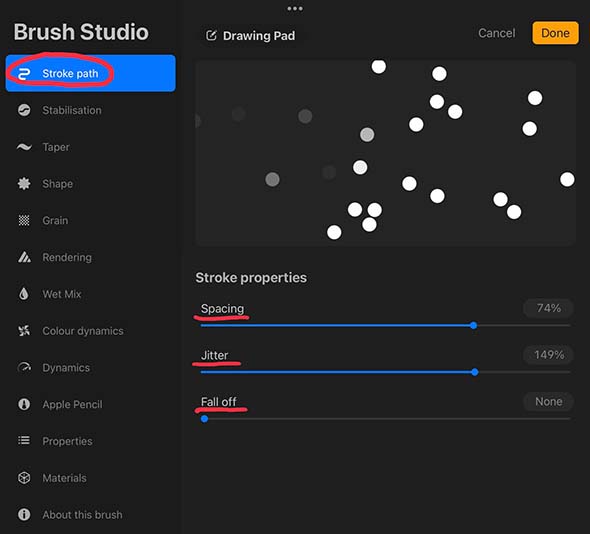
The first brush setting we are going to look at is the Stroke Path. You should be able to see it at the very top of the brush customization menu (On the left-hand side of your screen).
Once you have opened the Stroke Path settings, you will see that you have a few different slider options available to you:
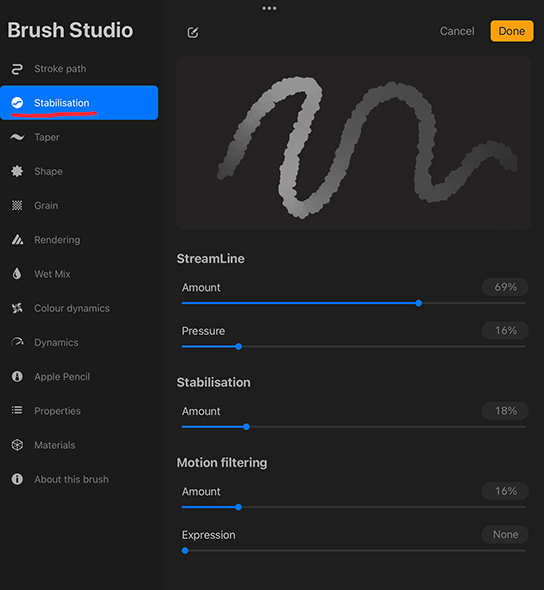
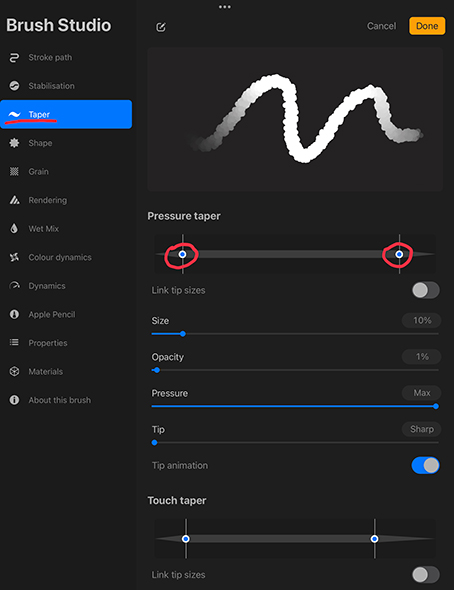
Next up in the Brush settings, we have the Taper menu. This selection of settings was actually added in a later version of Procreate, allowing artists even more accurate brush customization!
So, let’s talk about the different functionalities and what they can do for your brush:
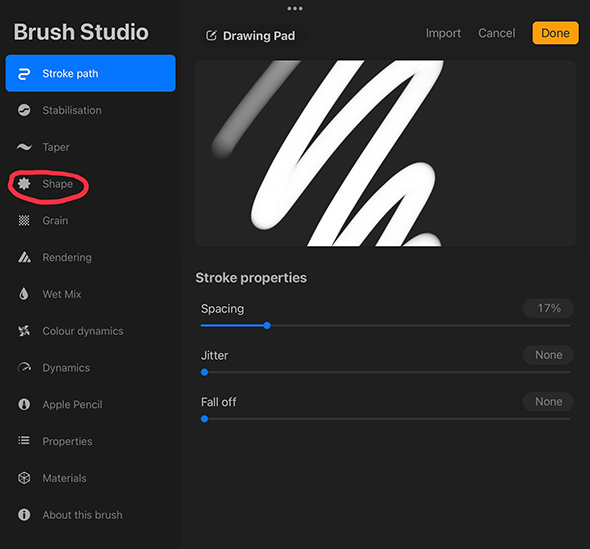
Each of your brush strokes is actually made up of a smooth series of shapes. In this Brush Shape menu, you will be able to affect the overall base shape for your entire brush and how it functions.
So here is what you need to know about the Shape menu:

Grain is essentially the texture of the shape of your brush. This can be useful for making your brush strokes look like a specific medium! Here are the different grain options you will have when creating your own brush:
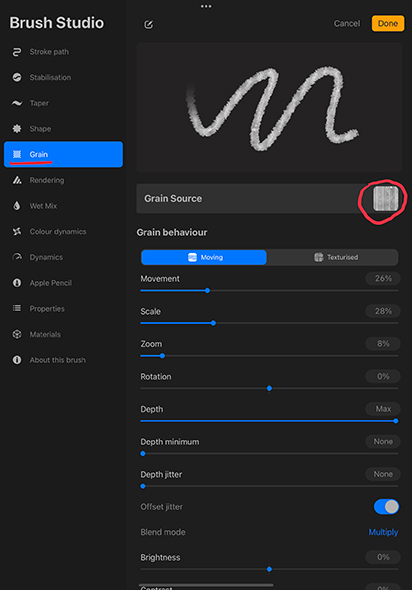
First of all, you can switch between two different modes when it comes to creating your brush’s grain: ‘Moving’ and ‘Texturized.’ The Moving option will integrate the grain into your brush’s overall shape texture, while Texturized option will make the grain a more repetitive texture.
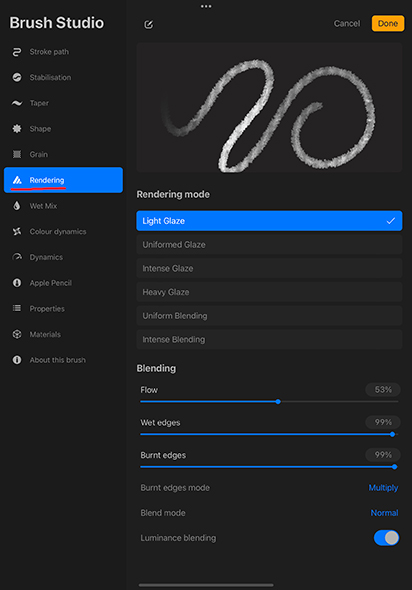
Procreate provides its users with six unique rendering modes: Light Glaze, Uniformed Glaze, Intense Glaze, Heavy Glaze, Uniform Blending, and Intense Blending. Light Glaze is the app’s default rendering setting.
However, each of the blending modes is worth experimenting with as they all have their own look. Underneath each of these rendering modes, you also have a range of additional customization sliders and toggles:
You can also control the look of your brush using the Burnt Edges Mode and Blend Mode tools.
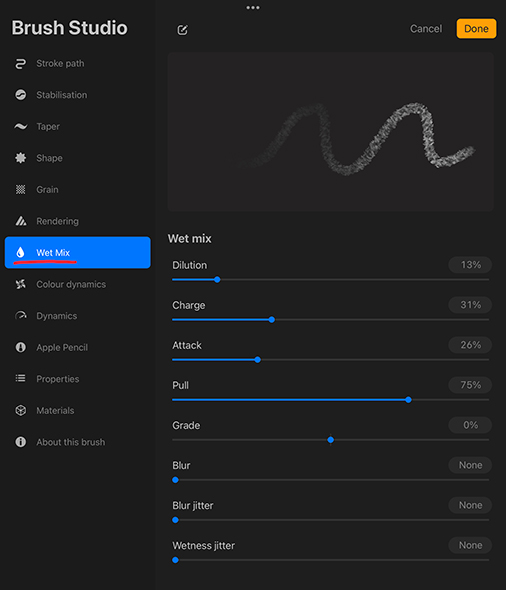
This customization menu is best thought about in terms of traditional painting techniques. Each of the settings controls aspects of your brush in a similar way to using actual paint, water, and paper.
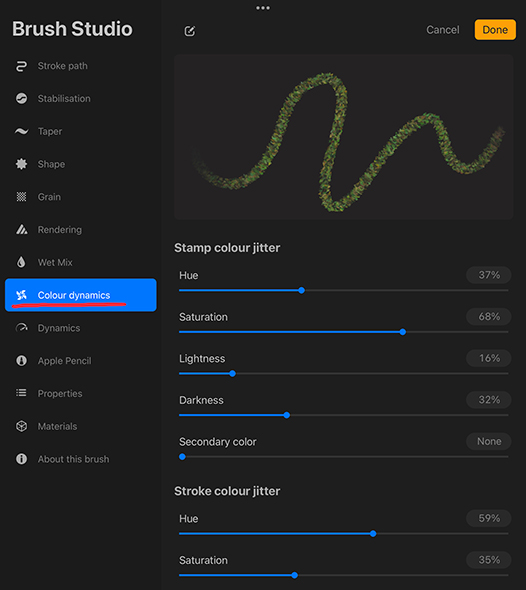
This menu allows you to customize the color variation of your brush within some smaller sub-menus. Under each of these categories, you are able to adjust Hue, Saturation, Brightness, and Intensity.
There are so many options within this category so it is important for you to experiment with each to get an idea of their effect.
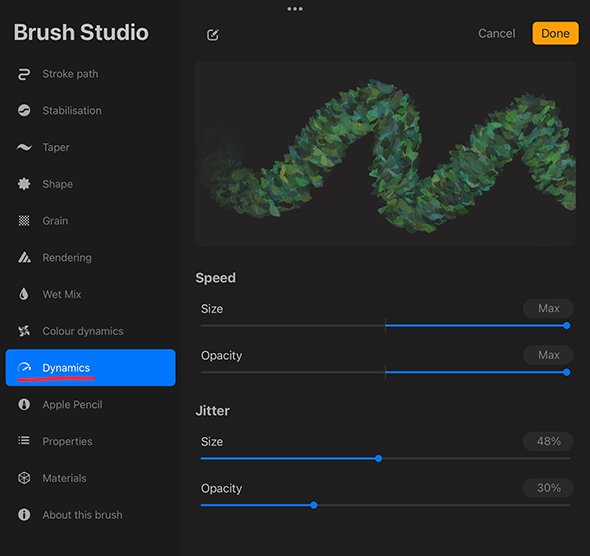
The dynamics of your brush are not affected by the pressure or tilt of your pencil while you draw. This makes them independent of the effects of the other settings.
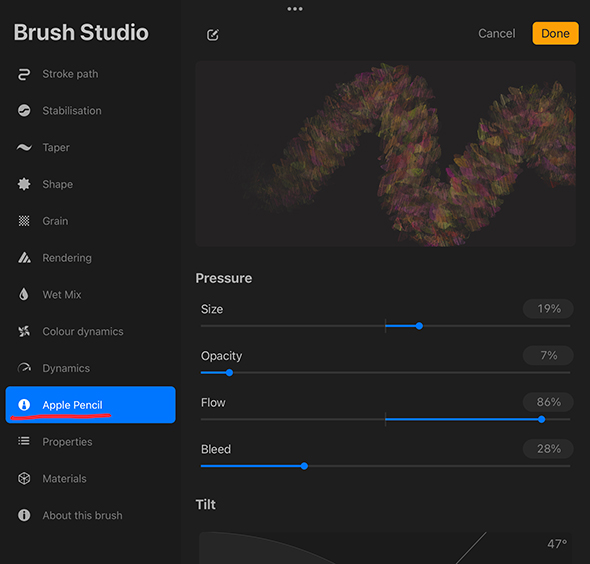
These settings control the overall experience of drawing with your pencil. The menu is broken into two main categories: ‘Pressure’ and ‘Tilt.’ Under each of these settings, you will be able to customize how these two factors affect the Size, Opacity, Flow, and Bleed of your brush.
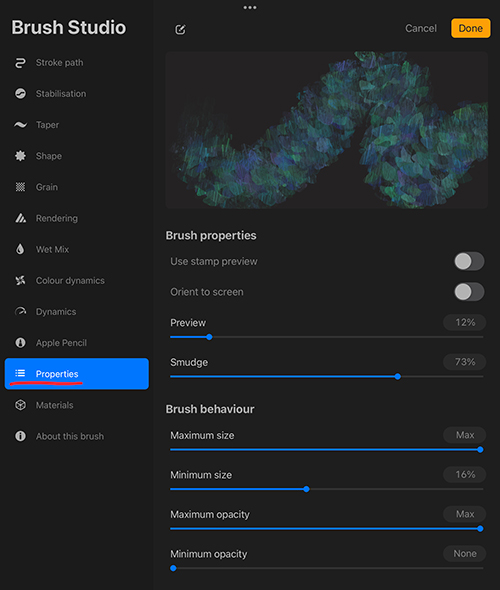
This menu contains some of the more simple brush settings: Brush Properties and Brush Behavior.
Now that you understand all of Procreate’s awesome brush customization options, you will be ready to start creating any brush you want! To help you get started, here are a few of the different brush types you might want to create.
Stamp brushes are essentially what they sound like: brushes that you can use to “stamp” different shapes into your work. This can be awesome for recurring shapes, pattern brushes, texture brushes, templates, logos, and decorations. So here is how you can make one for yourself!
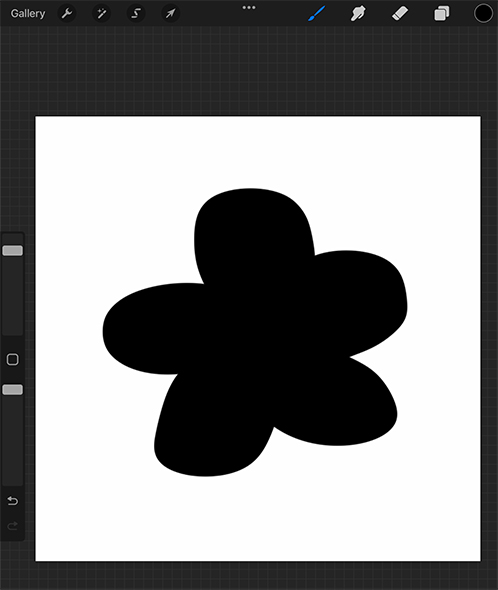
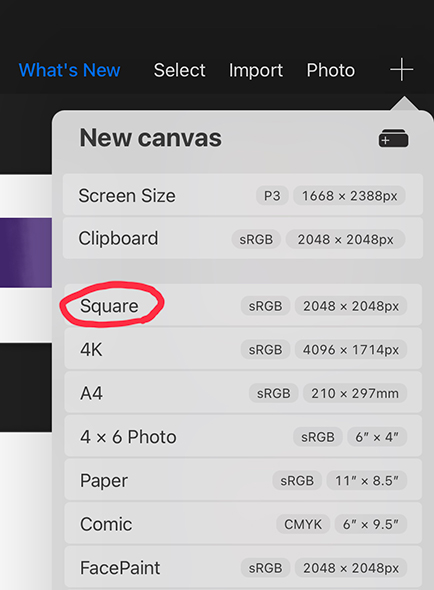
Open the Procreate app and create a square canvas. This is important to ensure your shape works as a stamp.
With a hard brush set to black, draw your desired stamp shape.
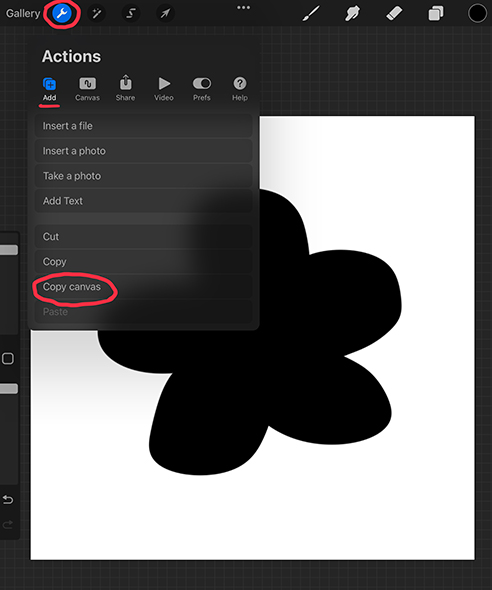
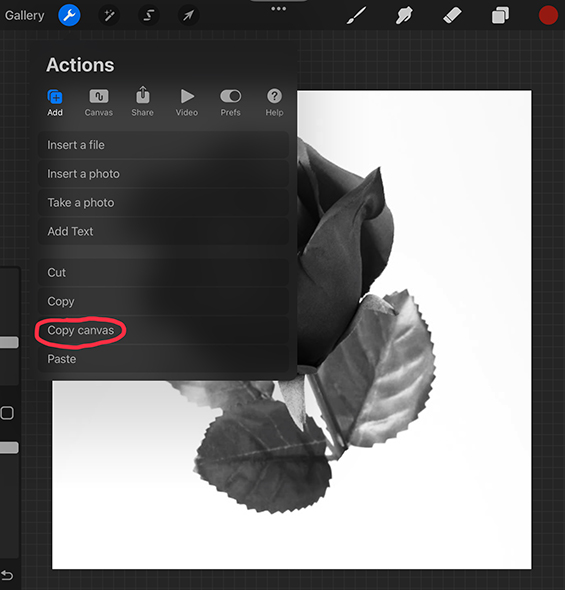
Navigate to the Actions Menu, you will find this by tapping the wrench icon in the top-left corner of the screen. Select Copy Canvas from the menu.
Open up the Brush Menu and tap the plus icon to create a new brush.
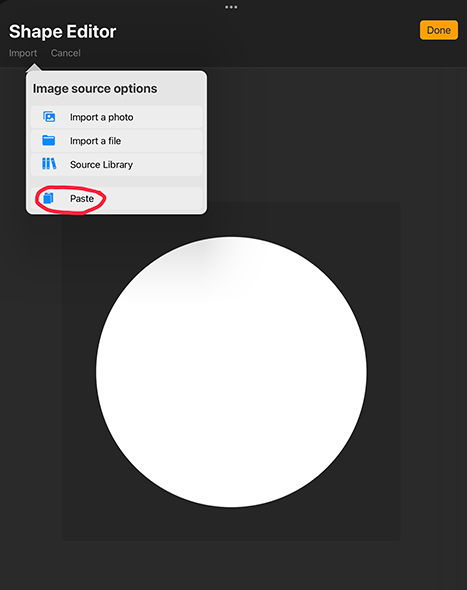
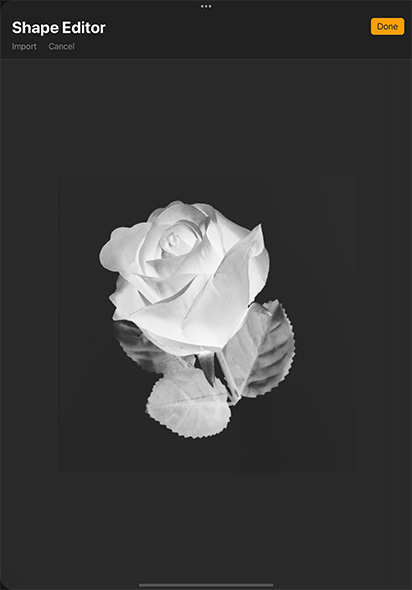
Open the brush Shape settings and tap on Shape Source. This should open up the Shape Editor. In the top left-hand corner of the editor, tap Import and then select Paste from the bottom of the menu.
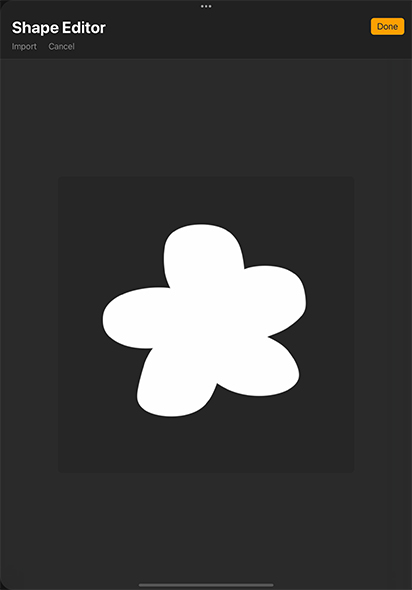
Tap the shape image with two fingers to invert its colors and then select Done.
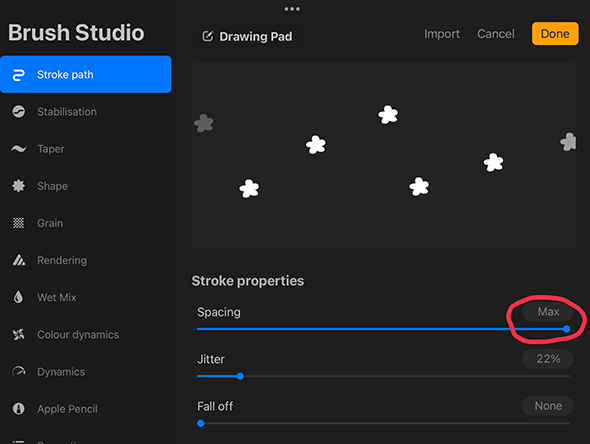
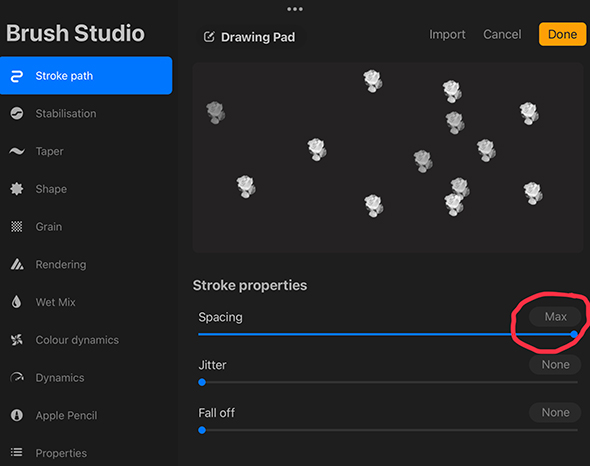
Open the Stroke Path menu and adjust the Spacing slider to 100% or Max. You can also increase the Jitter if you would like, however, this is optional.
For patterns and textures, you may want to increase the Scatter slider and Rotation in your Shape menu.
(Extra: You can also experiment with different opacities and size ranges for your stamp to make it more varied.)
If you want your stamp to remain uniform each time, skip this step.
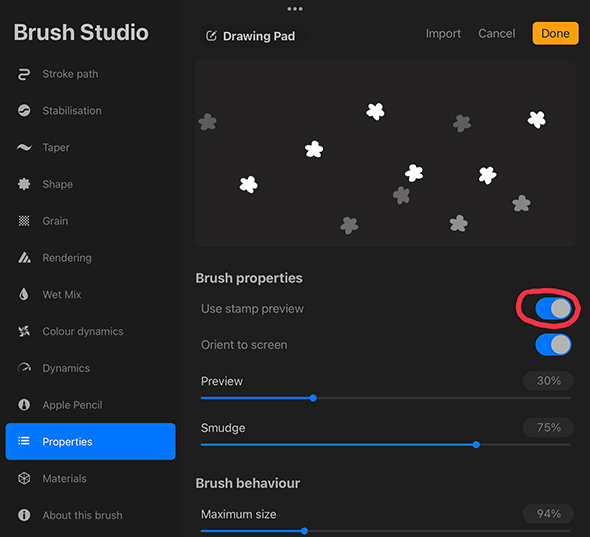
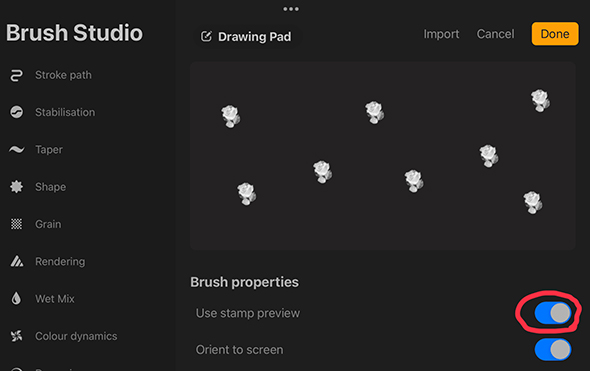
In the Properties Menu, you can also turn on Use Stamp Preview.
Press Done and enjoy your awesome new stamp brush!
Do you like pixel art? Then you may have wondered before if it’s possible to create a pixel brush in Procreate. The good news is, yes, it is very possible!
Pixel brushes are awesome for creating artwork that can be resized to any scale and used for a wide range of purposes. There are a few really important things you need to know when making a pixel brush. Here is all the info:
Open up a square canvas in Procreate and navigate to the Brush Menu. Select the plus icon from the top-right corner to create your new brush.
It is time to start customizing! Procreate’s default settings will be currently in place in the Brush Settings menu. The first thing we want to do is to change the brush’s shape. However, to do this, we need to have a square shape copied.
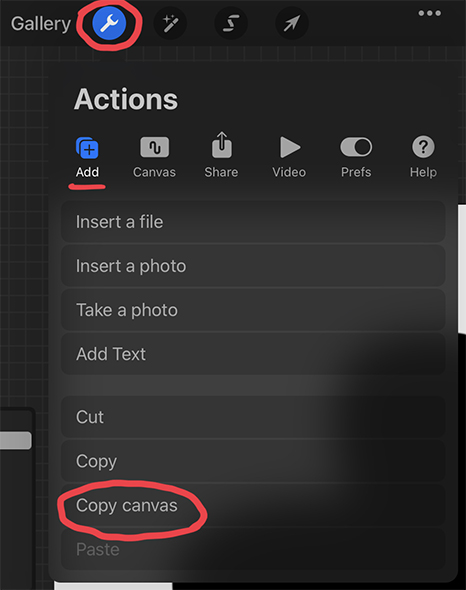
Navigate out of your Brush Setting menu and go to Procreate’s Actions Menu which can be found under the wrench icon in the top right-hand corner. Select Copy Canvas.
Open up the settings for your new brush again and navigate to the Shape menu. Tap on Shape Source. In the top left-hand corner of the editor, tap Import and then select Paste from the menu. Once your square is imported, select Done.
Enter the Stroke Path menu and adjust the Spacing slider to 0% or None. This will allow you to draw your pixels in a continuous line rather than spacing them out.

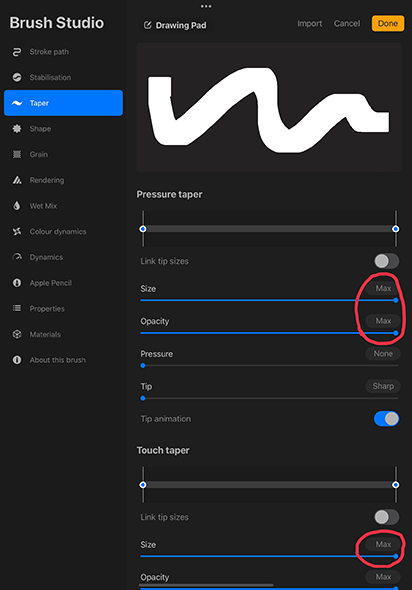
Next, you will need to open up the Taper settings. In the Pressure taper section, set the size and opacity sliders to 100% (Max). The pressure sliders should be set to 0% (None).
This should prevent your brush from tapering at the beginning and ending on your brushstroke. Increase the size and opacity to Max in the Touch taper settings as well.
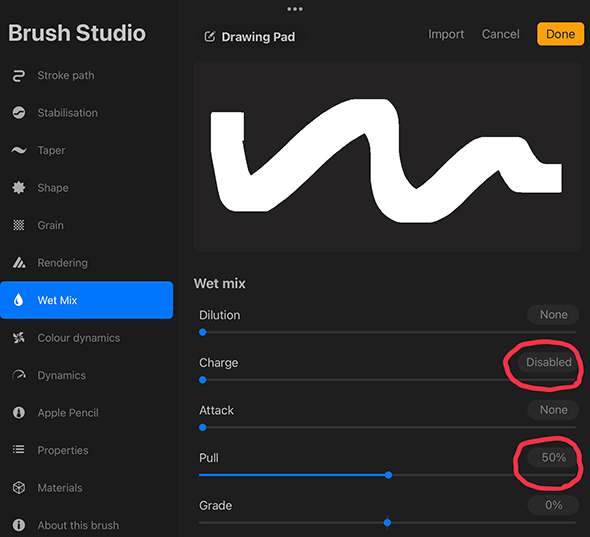
Open up the Wet Mix settings. Set your Charge slider to Disabled and your Pull slider to 50%.
Move onto the Apple Pencil menu, so that you can make changes to how your pencil will affect your brush. Slide the opacity slider to 0% (None).
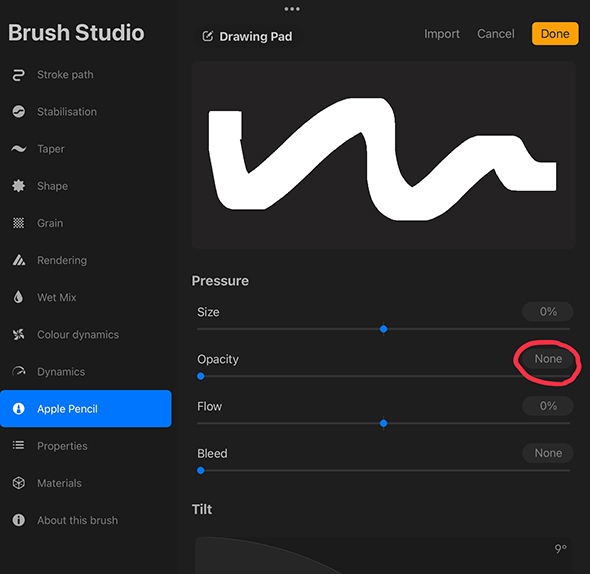
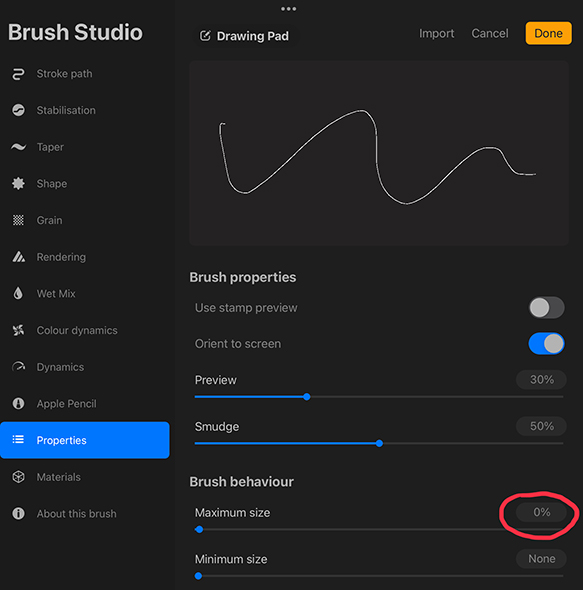
The last settings that we are going to customize are found in the Properties menu. Set your Smudge slider to 50%. In the Brush Behaviour section, change your brush’s Maximum Size to 0% (None).
Your brush may appear very small in your drawing pad after this step, but don’t worry! You will be able to increase its size when drawing!
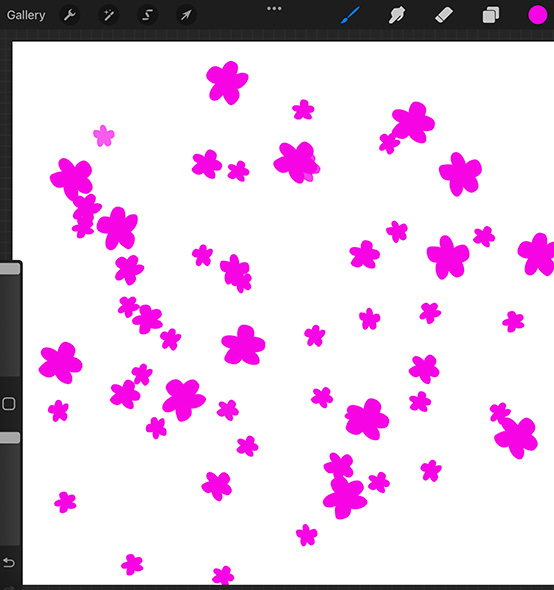
Test out your new brush on your canvas! Since the pixel brush is so small (this allows it to create a realistic pixel look) you may have to zoom in while you are drawing your pixel art. Once your pixel art design is complete, you can resize it using the Selection tool (Arrow Icon).
Make sure your Selection tool is set to Uniform on the menu bar when you are resizing. Drag the corners of the selection box to resize your pixel art as large as you want.
Congratulations! You have now created your first ever pixel design in Procreate!
One of the best ways to create unique textures in Procreate is to create a brush using an image. Yes, that’s right! You can make your own custom brush out of pretty much any image you want! Want to know how? Here are the steps:
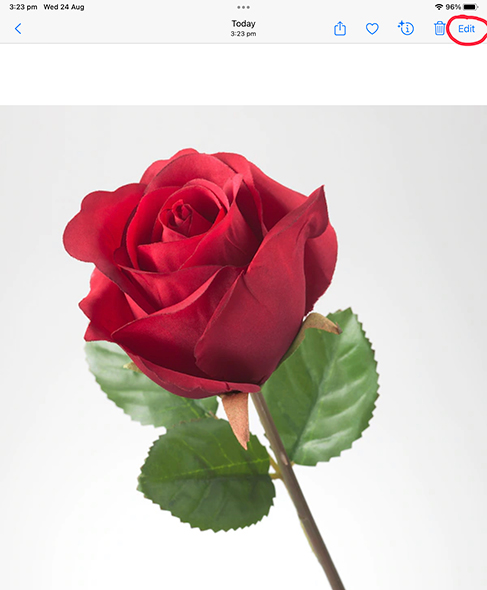
To make an image work as a brush in Procreate, you will first need to edit it. An image with no background or a light background with a dark subject will work best.
If the background of your image is dark, it will make the brush a square, rather than the shape of the object. So, let’s start editing! Start by moving out of the Procreate app and into your iPad’s photo gallery.
Open up your desired image in your iPad’s photo editor, and using the filters, change it to Mono or Monochrome. This should result in a grayscale version of your image, making it easier to see your image’s values.
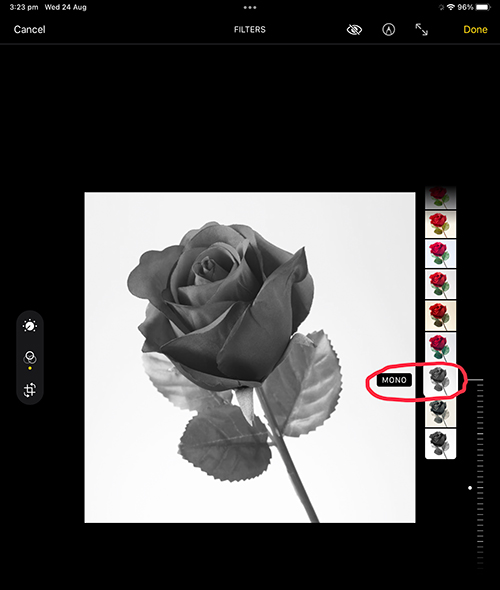
Increase the contrast of your image.
You will probably find that your background is still not completely white in your image (if yours has a background). Navigate back to your Procreate app and create a new square canvas (preferably at least 3000px x 3000px).
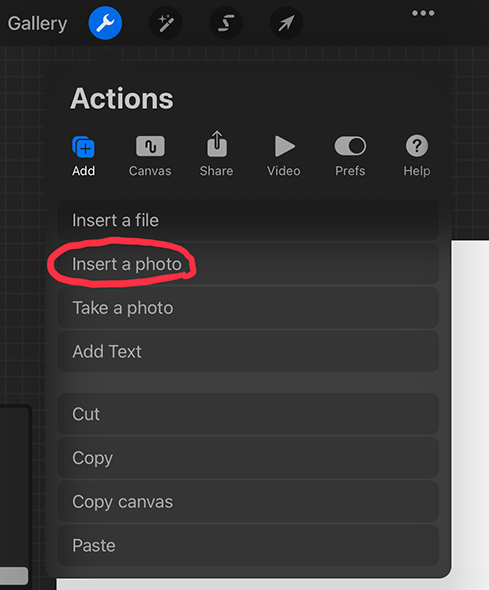
Then open up the Actions menu and select Import a photo.
Choose your edited image. Once the image is on your canvas, use a hard brush to erase around the subject of your image (leaving only what you want to be seen).

Choose your edited image. Once the image is on your canvas, use a hard brush to erase around the subject of your image (leaving only what you want to be seen).
Open the brush Shape settings and tap on Shape Source. This should open up the Shape Editor. In the top left-hand corner of the editor, tap Import and then select Paste from the bottom of the menu.
Tap the shape image with two fingers to invert its colors and then select Done.
Open the Stroke Path menu and adjust the Spacing slider to 100% or Max.
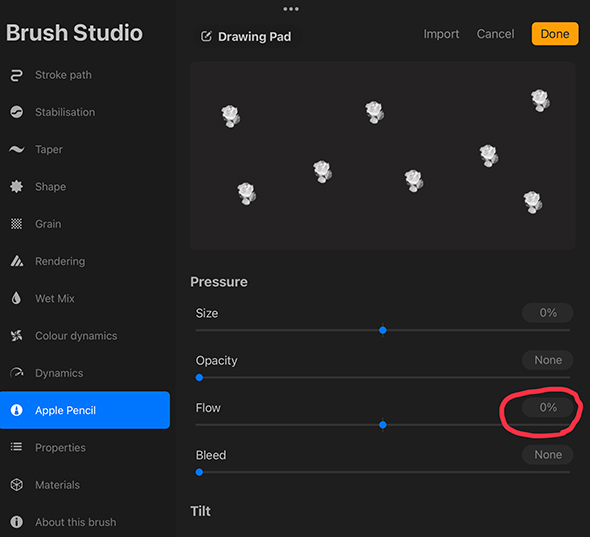
In the Apple Pencil settings, change the opacity to 0%. This should ensure your brush stays opaque and not transparent.
In the Properties Menu, toggle on Use Stamp Preview.
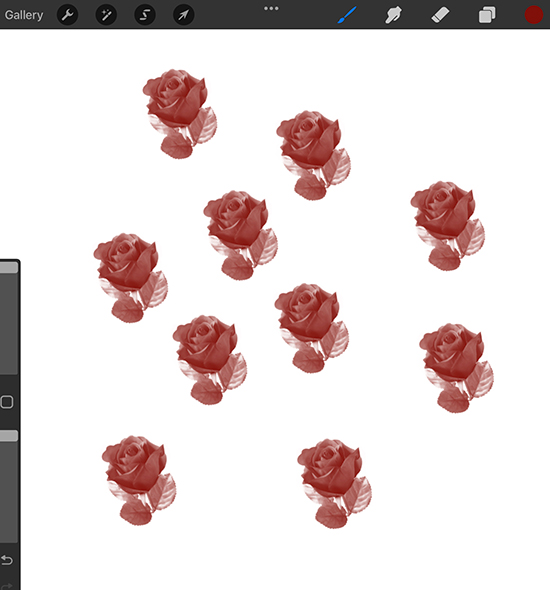
Press Done and you now have your own image brush!
What awesome brushes are you going to create in Procreate? Check out our Awesome Procreate Courses and get started illustrating in Procreate today!!
If you liked this blog post, you will also like to check our blog posts on how to blend in Procreate and Procreate tips.
Rhea
Rhea is an Australian concept artist who is currently studying at Griffith University. She is passionate about spreading her love of art to others.
Thank you for this well written and comprehensive explanation. I am an older (80) new Procreate user and this is perfect for me at this stage. Mahalo from Hawaii..
ReplyThank you so much for this tutorial. I'm a visual person so I love getting an explanation with pictures.
ReplyMerci pour ces explications regroupant tous les paramètres! J’ai une question : j’ai un pinceau qui, même contours fermés, ne permet pas la colorisation par drop de couleur. Je n’arrive pas à comprendre quel paramètre modifier pour qu’il le permette (il est en opacité maximale).. auriez vous une idée pour m’aider ? En vous remerciant
Hi Charlène, I am so glad to hear you enjoyed this tutorial! Thankyou for reaching out with this question, it is a common issue on some brushes. The first thing I would recommend you try is turning down your 'color fill threshold.' To do this, draw a shape with your brush, then drag your color onto your canvas as you usually would. Instead of letting go of your canvas, keep your finger on the screen when you color fill. At the top of the screen you should see the words 'color fill threshold' and a blue line. Drag your finger to the left-hand side of the screen until the colour fill only fills your line-work, rather than the entire page. Let me know if this works. Best, Rhea
Obrigada pela ajuda!! vai me adiantar muito em alguns projetos!! Explicação perfeita!!
ReplyCes tutoriels sont magnifiques, merci beaucoup de nous partager cette connaissance
Reply


 Gift Cards